FM18 Tactic: The 4-2-3-1 Formation, Inspired by Jose Mourinho
Jose Mourinho is a well-known manager who has made a big name for himself. Actually, considering his records, he’s an exceptional coach. And looking at his tactical method, it’s been tagged as “park the bus” tactic. This means that his tactic focuses more on keeping the team’s defence tight. Although this kind of method is good in some situations, it has its flaws.
In FM18, his tactic is really strong and effective. Playing against Manchester United in the game is like an impossible mission to come back victorious; just have in mind that you’re going to lose. You may have a strong chance of winning why playing against them on home ground, but it’s really hard to beat them at Old Trafford.
However, in this article, I’m going to share about a tactic that is inspired by him. This tactic may be a perfect fit for your team. But from my observations, this tactic works best with teams that have enough players with good physical abilities. Having pointed that out, I will be using Torino FC as an example because this tactic was also a success with the team.
Tactic: 4-2-3-1 Formation

In FM18, the Reds boss only uses the 4-2-3-1 shape in all his games. He hardly switches to another formation. The only place that he makes few changes is in the team instructions. While playing at Old Trafford, he uses a flexible team shape with a control mentality. Then, on away ground, he switches to high-structured shape with standard or counter (depending on the opponent’s status) mentality.
Because I use Torino, which isn’t big as Manchester United, I always use a standard mentality and a flexible team shape.
Moreover, Jose Mourinho usually employs an aggressive type of play, and that’s why he relies on physical play rather than technical. And his team is very fast when they counter-attack.
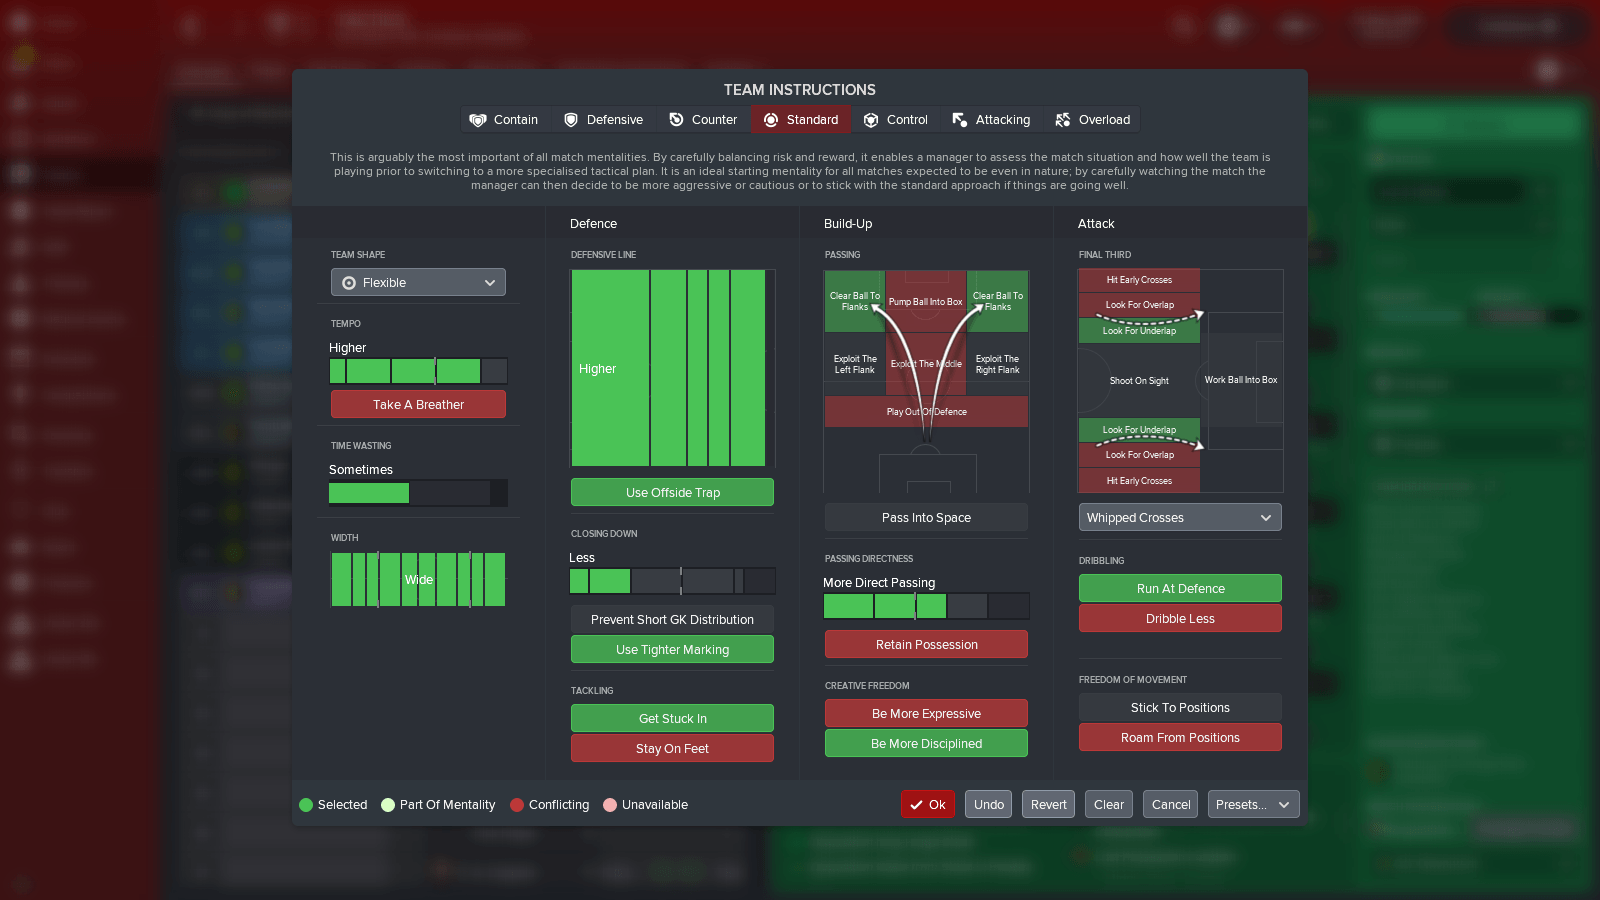

From the screenshots above, there are two different team-instruction settings. The first one contains the instructions I employ while playing at home or while facing the underdogs. But I use the second settings while playing away or facing teams like Juventus. Sometimes I use both of them during the match – it depends. However, the former inspires the team to press hard. While the latter tells the team to play very cautiously.
In general, the team plays at higher tempo and instructed to make use of the full width of the pitch. From the defence section, get-stuck-in and use-tighter-marking are enabled. Then from the build-up section, the instruction is to clear ball to the flanks with a more direct passing. The creative freedom set to be-more-disciplined.
Finally, from the attack section, look-for-underlap is instructed. This is because Jose’s fullbacks are not programmed to attack.
Roles and Duties
Keeper: Goalkeeper (Defend)
The ideal setting for this role is Goalkeeper. This tactic doesn’t need a sweeper keeper.

Central Defence: Ball Playing Defender (Defend) and Central Defender (Defend)
In the Ball Playing Defender (BPD) role, the assigned player can comfortably hit through balls to the fullbacks or attacking wingers for them to press forward. This type of defender has the confidence to hold the ball a little before making a decision. However, this role is a weapon for counter attack because the defender can provide accurate long passes to his teammate in the final third.
With the defend duty, the player has to move a bit forward to break up attacks by intercepting passes. Also, he has to try as much as possible to prevent the ball from getting into the box.
The central defender’s work is almost the same as the BPD. But since this is an aggressive tactic, the assigned player needs to help maintain some amount of possession by engaging in simple passes. A defensive role that gives the ball away carelessly is not ideal for this tactic.


Side Backs: Two Fullbacks (Support)
Mourinho makes use of the fullback role but his fullbacks aren’t programmed for attacking. The wingers carry out the attacking job. The fullbacks stay in line with the centre-backs and help close down the opponent. When the team’s attack fails, the fullbacks will be available to recycle and support forward play.
You may prefer to use the Defensive Full-Back (DFB) role. But the thing is that the DFB role rarely supports forward play and it rarely makes intelligent crosses. However, selecting the automatic duty is a good idea if you want the player to switch to any specific duty that is most suitable during the match.


Central Midfield: Deep Lying Playmaker (Defend) and Central Midfielder (Support)
Just like what I wrote in this article, the Deep Lying Playmaker (DLP) operates in the space between the midfield and defence. The assigned player is like an all-round midfielder who can dominate the midfield, improve the connection between the defenders, central attacking midfielder, and striker. In this tactic, this player controls the team’s game. However, with the defend duty, he rarely gets forward to support attack.

The Central Midfielder (CM) acts like a pivot that supports all the roles. It’s an industrious role that attacks and defends through the central area of the pitch. He really helps the DLP in controlling the game. While the deep-lying playmaker stays at the mid-pitch, the CM gets forward to support the attacking players.

Side Attacking Midfield: Winger (Support) and Inside Forward (Support)
In FM18, the Reds manager relies mainly on the Winger and Inside Forward when it comes to attacking. For the winger role, the player must be quick and good at dribbling because he must beat his opponent as fast as possible to create a scoring chance for the striker. The winger role is the deadliest attacking role in this tactic. With the support duty, he only needs to get pass his marker quickly and then aim for a dangerous cross to the striker or attacking midfielder.
The Inside forward with the support duty is preferable because the player tends to draw back a bit to receive passes, provides killer balls for the striker, assists in winning the ball from the flank when the team defends, and makes excellent runs in the opposition’s box. He usually cuts inside to create chances for the forwards. Depending on the type of players available, you can choose to select the inside forward role in both left and right positions.


Central Attacking Midfield: Attacking Midfielder (support)
In this tactic, the attacking midfielder (AM) acts as a second striker. When the striker is unable to receive a killer pass or cross, the AM makes use of such delivery. Just like Juan Mata, the assigned player should have the technical ability to be creative. With the support duty, the player helps in defence and also provides support for the striker.

Central Forward: Complete Forward (Attack)
This role is more flexible because it allows the striker to drop a little deep like Deep-lying forward, or move towards the flank to receive the ball. It also allows the striker to pass, drop killer balls, dribble, and cross to a well-positioned teammate. Individually, you need to train any player in this role to beat the offside trap; it’s necessary for the tactic. In other words, if you have a good Target Man (TM), you can opt for the TM role.

Training
Most times I do leave the general training to my assistant manager while I handle the individual training. But if in case you have players with more technical abilities rather than physical, you need to focus on training them to build their physic. Or, sign good physical players. Perhaps, this tactic will work very well for your team irrespective of the kind of squad you have.
Opposition Instructions
This tactic doesn’t need opposition instructions. But you can try any setting you feel that is most suitable for your team. Just have in mind that the settings depend on the opponent you’re facing.
Set Pieces
The screenshots below show how Mourinho sets his set pieces. You can set your own version if you like.
Corners


Free Kicks: Defend and Attack


Results and Stats


Analysis


Feel free to drop any questions in the comment box below.
Download Tactic
[lockercat]Click here[/lockercat]